
One of the most confusing things for traders—especially beginners—is seeing conflicting signals on the same currency pair.
You might look at one chart and see a clear buy setup, then switch to another timeframe and see a sell opportunity on that exact same pair.
So which one is right?
The truth is: they both can be right at the same time.
And once you understand why, your trading will immediately become more focused, more disciplined, and a whole lot less stressful.
Understanding Multi-Timeframe Analysis in Forex
The Forex market moves in layers.
Each timeframe tells a different part of the story:
- Lower timeframes (like the 1H) show short-term price movement
- Higher timeframes (like the 4H and Daily) show broader market direction
That means price can be:
- Pulling back on a lower timeframe
- While still trending in the opposite direction on a higher timeframe
This is not a contradiction.
This is how the market naturally flows.
Premium vs. Discount: The Real Driver Behind Your Bias
In my trading, I determine buy or sell opportunities based on price location, not just direction.
Using Fibonacci:
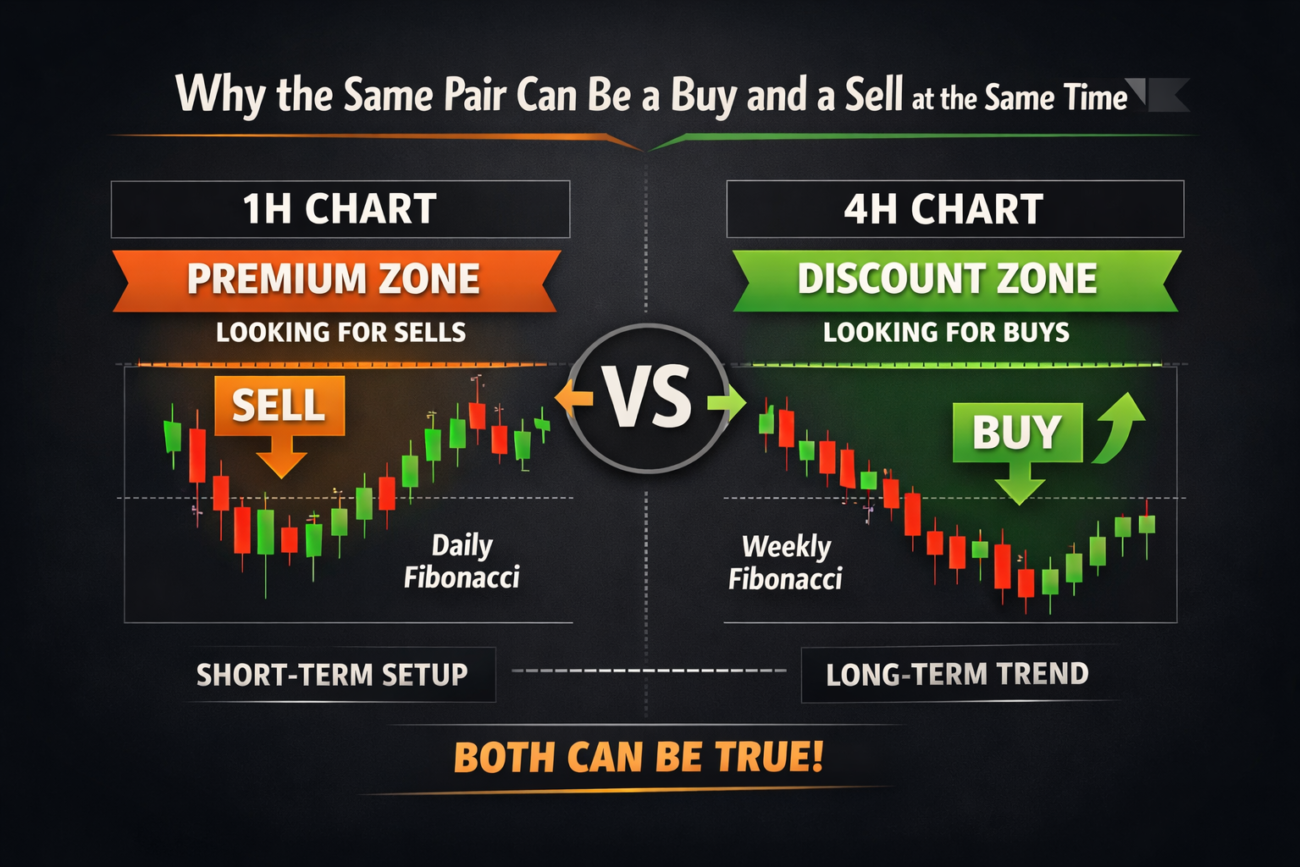
- Premium Zone = Selling opportunities
- Discount Zone = Buying opportunities
Now here’s where it clicks.
Example: USDCAD
- On the 1H chart, price may be in a premium zone based on the daily Fibonacci → Looking for sells
- On the 4H chart, price may be in a discount zone based on the weekly Fibonacci → Looking for buys
Same pair.
Different timeframe.
Different opportunity.
And all of it makes perfect sense.
Why This Is Actually a Good Thing
Most traders think this is confusing.
Experienced traders know this is where the opportunity is.
Here’s why:
- It allows you to align with your specific trading style
- It helps you avoid forcing trades that don’t match your timeframe
- It gives you clarity instead of emotional conflict
If you’re trading the 1H:
→ Focus on the 1H setup
If you’re trading the 4H:
→ Focus on the 4H setup
Simple. Clean. Disciplined.
How This Fits Into the BRACE Method
My method is built on:
Break. Retest. And Confirm Entry.
But here’s the key:
👉 BRACE only applies AFTER price is in the correct zone
That means:
- I’m not looking for buys in premium
- I’m not looking for sells in discount
So even if two timeframes show different opportunities,
I will only take the trade that aligns with:
- My timeframe
- My price zone (premium or discount)
- A valid BRACE setup
What Happens If Price Keeps Moving?
This is where discipline matters.
If price continues higher in a premium zone:
→ I don’t switch to buying
→ I adjust my zone to the new high and wait for a sell
If price continues lower in a discount zone:
→ I don’t switch to selling
→ I adjust my zone to the new low and wait for a buy
No chasing.
No confusion.
Just structure.
The Role of the 200 SMA (Awareness, Not Bias)
You may notice the 200 SMA on my charts.
Let me be clear:
- It is not used to determine buys or sells
- It is used for awareness of overall market positioning
This helps provide context so traders understand why price may appear to move “against” the SMA at times.
Final Thoughts
If you’ve ever felt confused seeing different signals on different timeframes, you’re not alone.
But now you know:
👉 Two things can be true at the same time in the market
The key is not to trade everything you see.
The key is to stay consistent with your timeframe and your rules.
That’s how you move from confusion… to confidence.
Very helpful!!! You put in a lot of work and it’s well worth it! Well done
Thanks Jason! it is a continue work in progress! I welcome your feedback at anytime.