
This GBPUSD setup this week perfectly explains why I built my BRACE process around patience and confirmation instead of emotional breakout entries.
Because the first breakout was a trap.
And that matters.
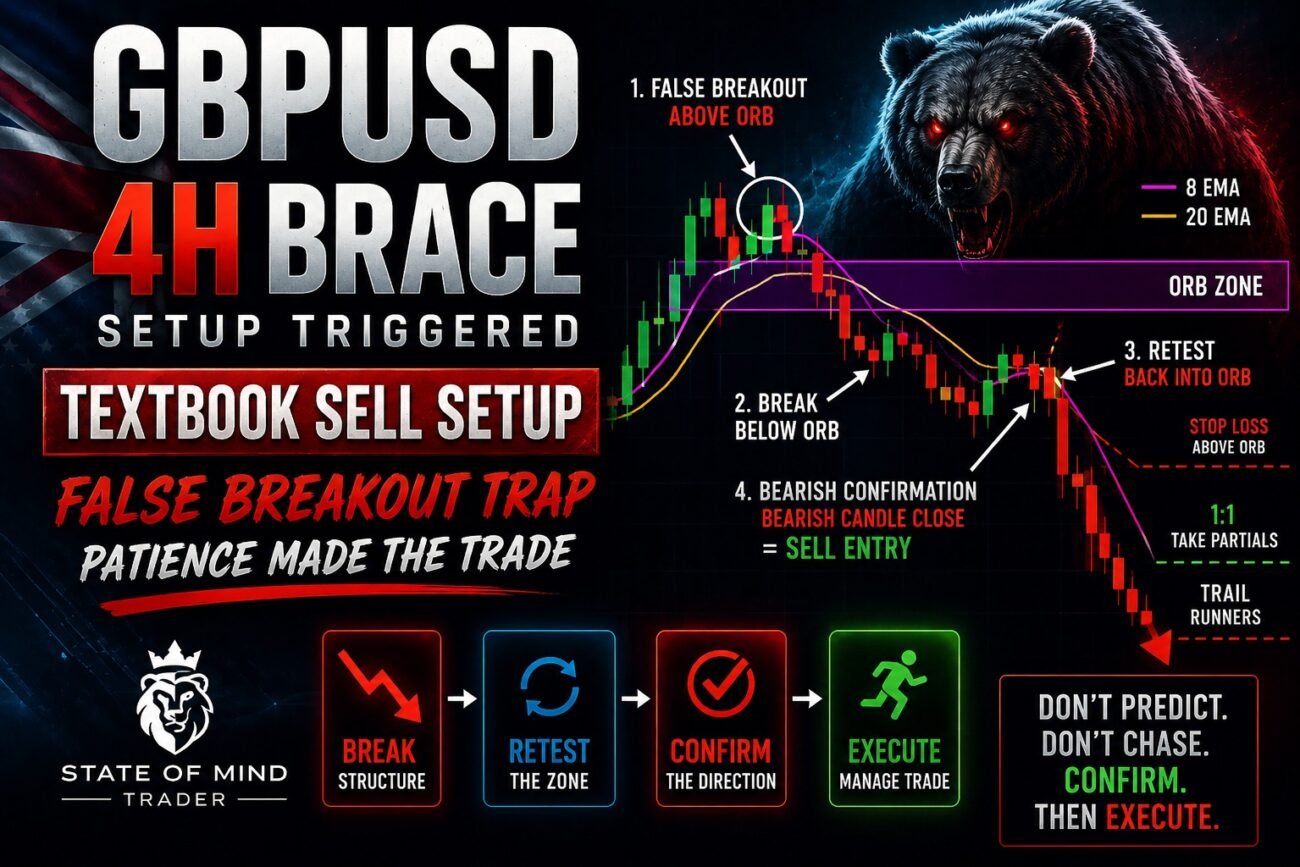
Price initially broke above the 4H ORB (Opening Range Break) zone and looked bullish.
To most traders, that breakout candle probably looked convincing enough to buy immediately.
But this is exactly why traders get trapped over and over again.
A breakout by itself means absolutely nothing if price cannot maintain acceptance beyond the zone.
That first breakout above the ORB completely failed.
There was no proper continuation.
No strong confirmation.
No sustained bullish acceptance.
Instead, price reversed back beneath the ORB and shifted the entire market structure.
That failure above the ORB became the warning sign.
Then came the real setup.
Price broke beneath the ORB, came back for the retest from underneath, printed the bearish confirmation candle, and that was the sell entry.
That second breakout was the valid BRACE trade.
Not the first one.
This is why patience matters so much in trading.
The traders who rushed into the first breakout likely got trapped.
The traders who waited for confirmation stayed protected and caught the actual move.
What Is BRACE?
BRACE stands for:
Break. Retest. And Confirm Entry.
Every piece matters.
The mistake most traders make is treating the breakout itself like the entry signal.
But in my system, the breakout only puts the setup on watch.
The retest and confirmation are what validate the trade.
The process is simple:
- Price breaks structure
- Price retests the breakout area
- Price confirms direction
- Then the trade is executed
That confirmation candle is critical because it tells me whether price truly accepts the breakout or whether the market is simply running a liquidity trap.
GBPUSD just gave a perfect real-world example of that this week.
How I Simplified BRACE Using The 4H ORB
One of the biggest changes I made recently was simplifying my entire process around the 4H Opening Range Break.
The ORB zone comes from the very first 4H candle.
That candle creates the framework for the week.
Once price breaks beyond that structure, I immediately begin watching for BRACE conditions.
What I love about this method is how clean it keeps trading.
No clutter.
No overanalysis.
No needing fifteen indicators arguing with each other like they’re on a reality TV reunion episode.
Just structure.
Retests.
Confirmation.
Execution.
Simple trading tends to survive longer than complicated trading.
GBPUSD 4H Chart Breakdown
This setup unfolded in stages, and every stage mattered.
Stage One – The False Bullish Breakout
Price initially broke above the ORB zone and looked bullish.
This is where impatient traders usually enter too early.
But after the breakout, GBPUSD failed to maintain bullish continuation.
Instead of expanding higher with strength, price stalled and rotated back downward.
That immediately told me the breakout was becoming suspicious.
The market was failing to accept price above the ORB.
That failure was the first major clue.
Stage Two – Price Reverses Back Beneath The ORB
Once price moved back beneath the ORB structure, the entire situation changed.
Now the market had shifted from:
“possible bullish continuation”
to:
“potential bearish reversal”
At this point, I was no longer interested in buys.
Now I wanted to see whether sellers could confirm control beneath the ORB.
And that confirmation eventually came.
Stage Three – The Real BRACE Entry
After breaking beneath the ORB, GBPUSD came back upward into the breakout zone for the retest.
This retest is where BRACE becomes powerful.
Because the retest allows traders to see whether price will reclaim the structure or reject it.
GBPUSD rejected it.
Then the bearish confirmation candle closed.
That candle was the entry trigger.
Full Entry Process
- False breakout above the ORB
- Failure to maintain bullish continuation
- Rotation back beneath structure
- Bearish breakout beneath the ORB
- Retest into the ORB from underneath
- Bearish confirmation candle closes
- Sell entry executed
- Stop loss placed above ORB structure
- Partial profits secured at 1:1
- Remaining position trailed
If you caught this trade correctly, you would already be sitting in profit while your original risk is removed from the table.
That is exactly how I prefer managing trades.
Protect capital first.
Then allow runners the opportunity to continue paying.
Why The Retest Matters More Than The Breakout
This entire setup proves why traders should never blindly chase breakout candles.
False breakouts happen constantly in forex.
The retest is what separates valid continuation from a trap.
The first breakout above the ORB failed because price could not hold acceptance above structure.
The second breakout beneath the ORB succeeded because price respected the retest and confirmed bearish continuation.
That difference changes everything.
And honestly, most traders lose money simply because they refuse to wait long enough to see it.
What Happens If Price Never Returns To The ORB?
One important thing traders need to understand is that not every setup will give multiple retests back into the ORB zone.
Sometimes price breaks, confirms, and simply keeps running.
That is why catching the original BRACE entry matters so much.
Because once momentum expands, the market may never give that same ORB retest again.
If price does not return back into the ORB for another entry opportunity, I then shift into what I call a RACE continuation entry.
At that point, I am no longer looking for retests of the ORB itself.
Now I want to see price retest the moving averages instead, specifically:
- the 8 EMA
- or the 20 EMA
From there, I wait for confirmation again before entering continuation trades.
So at that point I am:
Retesting And Confirming Entries (RACE)
This allows traders who missed the original BRACE entry to still participate in the trend without emotionally chasing price.
The difference is simple:
- BRACE begins from breakout structure
- RACE begins from momentum continuation
But both still require patience.
And both still require confirmation.
Why I Prefer Executing From The 4H Chart
The 4H chart helps remove emotional overtrading.
The lower the timeframe, the more noise enters the market.
And noise is expensive.
The 4H gives me:
- cleaner structure
- stronger confirmation
- more patience
- less stress
- fewer impulsive decisions
That matters more than most traders realize.
You do not need to be glued to charts all day to become profitable.
You need structured execution.
My Plan For GBPUSD This Week
GBPUSD has already confirmed the bearish BRACE setup beneath the ORB structure.
Now I want to continue seeing price respect that zone from underneath.
Here’s exactly what I need to see next:
- Price remains beneath the ORB
- Pullbacks continue failing beneath structure
- Sellers maintain control on retests
- Lower highs continue forming on the 4H
- EMA pullbacks potentially create RACE continuation entries if price does not revisit the ORB
As long as GBPUSD remains beneath that ORB structure, I remain bearish on this pair.