
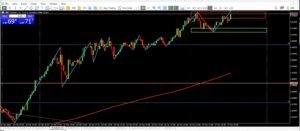
When analyzing EURAUD, I’m not starting on the 1-hour chart—I’m starting with the higher timeframe.
No trade yet—waiting for Break, Retest, and Confirmation before any entry.
The 1-hour chart is simply where I refine my entry.
The real story is being told by the daily and monthly levels.
Understanding Where Price Is
My Fibonacci levels are drawn from the daily timeframe, which allows me to clearly identify whether price is in a premium or discount zone.
Right now, price has pushed into a premium area, which immediately shifts my mindset.
At the same time, the tan horizontal levels on the chart represent key zones from the monthly timeframe. These are not minor levels—these are areas where price has historically made strong decisions.
When you combine:
- Daily premium positioning
- Monthly resistance levels
You get a high-probability area of interest for potential sells.
But—and this is where most traders go wrong—
area alone is not a signal.
Why I’m Not Selling Yet
Just because price is in a premium zone does not mean I immediately enter a sell.
The market does not reward anticipation—it rewards confirmation.
So instead of jumping in early, I wait for the market to show its hand.
The BRACE Method (My Entry Framework)
Every trade I take follows the same structure:
BRACE — Break. Retest. Area. Confirm. Entry.
This is how I remove emotion and trade with precision.
B – Break
The first thing I need to see is a break in structure to the downside on the 1-hour chart.
This tells me that buyers are no longer in full control and that momentum may be shifting.
R – Retest
After the break, price must pull back and retest that level.
If there is no retest, I’m not interested.
This step filters out false breakouts and prevents me from entering at the worst possible time.
A – Area of Value
The retest must occur within my zone of interest, which in this case is:
- The daily premium Fibonacci zone
- The monthly resistance level (tan lines)
This is what creates alignment between timeframes.
C – Confirm
At the retest, I look for clear signs that price is rejecting the area:
- Strong wicks
- Slowing bullish momentum
- Clean shift in structure
This is where the market confirms the idea—not me.
E – Entry
Only after all of these conditions are met do I take the trade.
No shortcuts. No guessing.
What Happens Next
There are only two outcomes here—but either way, I stay aligned with structure.
1. Price Rejects the Zone
If price gives me a clean BRACE setup:
- Break of structure
- Retest into my zone
- Clear confirmation
Then I will look for sell entries targeting lower structure.
This is where higher timeframe alignment meets precise execution.
2. Price Pushes Higher
If price continues to push higher, I do not flip bias and start buying.
Instead, I readjust my zone.
I move my premium area up based on the new high, allowing price to complete its move while I stay patient.
Then I wait again for the same setup:
Break → Retest → Confirm → Entry
Because in a premium market, I’m not chasing buys—
I’m waiting for price to give me a better sell.
Final Thoughts
EURAUD is currently sitting in a strong premium zone at higher timeframe resistance, which makes it an ideal area to watch for sell opportunities.
But the key word is watch.
I’m not here to predict—I’m here to react with precision.
The goal is simple:
Let price come to your level… then let it prove itself.