
USDCHF Just Delivered Another Clean BRACE Entry
USDCHF gave another strong example this week of why the BRACE process works so well when traders stay patient and allow price to confirm itself.
This setup was clean.
No guessing.
No chasing.
No emotional breakout entries.
Just structure, retest, confirmation, and execution.
And honestly, this pair respected the process beautifully.
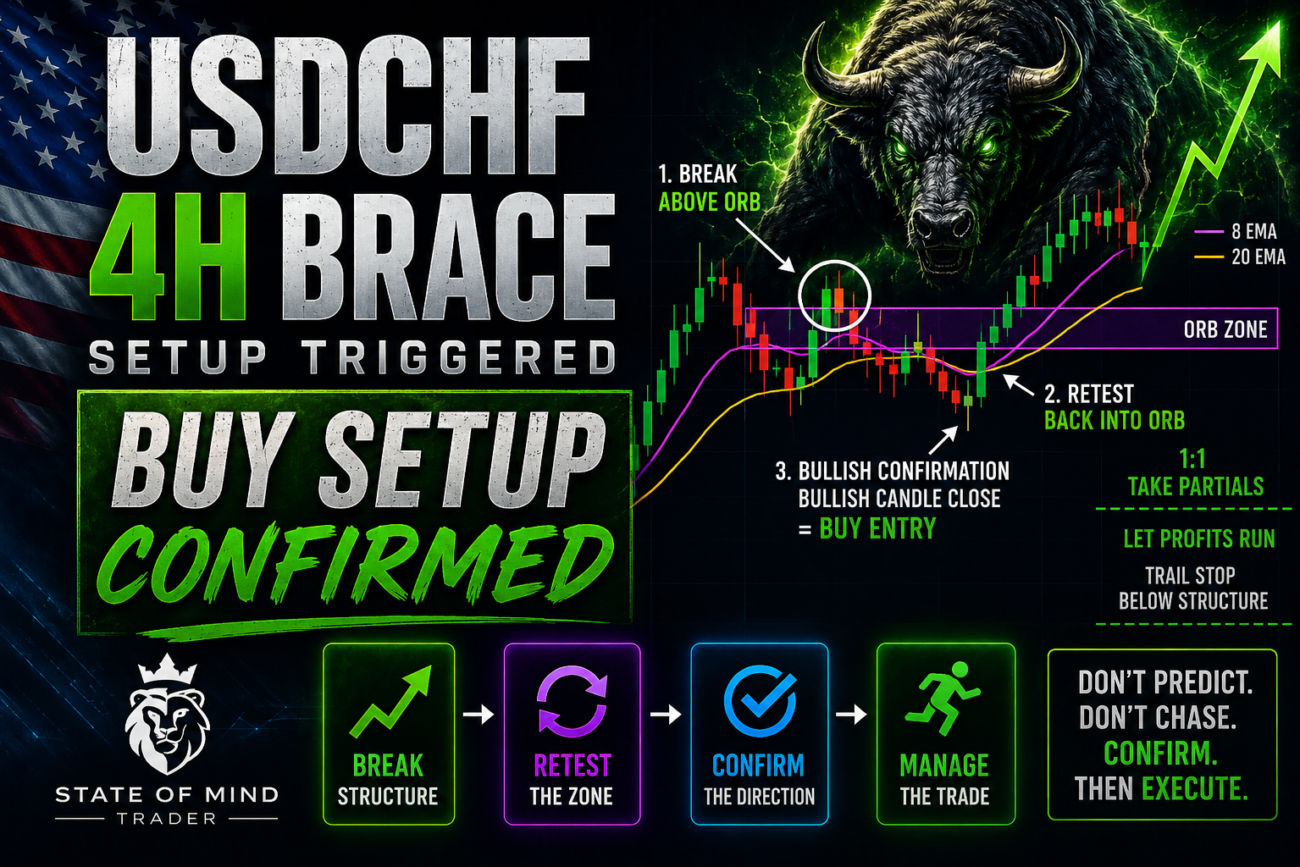
Price broke above the ORB structure, came back into the retest zone, held support, and then confirmed bullish continuation from the area.
That confirmation candle was the entry.
If you caught this setup properly earlier in the week, you would already be sitting in profit while managing the trade from a protected position.
That is exactly how I want trades handled.
Protect the downside first.
Then allow the market room to continue paying.
What Is BRACE?
BRACE stands for:
Break. Retest. And Confirm Entry.
This is the core foundation of my trading process.
Most traders enter emotionally on breakout candles.
But breakout candles alone are not enough.
The market must prove acceptance beyond the breakout area first.
That is where the retest and confirmation become critical.
The process is simple:
- Price breaks structure
- Price retests the breakout area
- Price confirms direction
- Then the trade is executed
That confirmation candle is what protects traders from unnecessary traps and fake continuation moves.
BRACE slows the process down and forces discipline.
And discipline is what separates traders from gamblers.
How I Use The 4H ORB
My ORB (Opening Range Break) framework comes from the first 4H candle.
That first candle creates the structure I monitor throughout the week.
Once price breaks beyond the ORB zone, I immediately begin watching for BRACE conditions.
The beauty of this method is how simple it keeps trading.
No clutter.
No overcomplication.
No trying to force trades because a random candle moved aggressively.
Just clean structure and patience.
And USDCHF respected that process almost perfectly this week.
USDCHF 4H Chart Breakdown
This setup unfolded exactly the way I like to see them develop.
Stage One – Bullish Break Above The ORB
Price successfully broke above the ORB structure and began expanding upward.
That breakout immediately placed the pair on bullish watch.
But again — the breakout itself was not the trade yet.
The retest still needed to happen.
Stage Two – The Retest Holds
After the breakout, price pulled back into the ORB zone.
This is where weak breakouts usually fail.
But USDCHF respected the structure beautifully.
Instead of collapsing back beneath the ORB, buyers defended the retest and maintained bullish acceptance above the zone.
That was important.
Because successful retests are often what create continuation momentum.
Price also began respecting the 8 EMA and 20 EMA during the continuation move, which added additional bullish structure support.
Stage Three – Bullish Confirmation Entry
Once buyers defended the retest area and bullish confirmation candles began printing again, the BRACE entry became valid.
That confirmation candle was the trigger.
Full Entry Process
- Bullish breakout above the ORB
- Pullback into structure
- Buyers defend the retest
- Bullish confirmation candle closes
- Buy entry executed
- Stop loss placed beneath structure
- Partial profits secured at 1:1
- Remaining position trailed
This is exactly why patience matters.
The traders who wait for confirmation usually end up with cleaner entries, tighter management, and less emotional stress.
Why Confirmation Matters So Much
Breakouts happen every day in forex.
But not all breakouts survive.
The retest exposes whether the breakout is legitimate or whether price is simply running a trap before reversing.
That is why I never treat the breakout itself like the trade.
The retest and confirmation are what validate the move.
USDCHF gave a clean example of bullish acceptance this week.
And honestly, clean setups like this are why I prefer keeping trading simple.
When BRACE Turns Into RACE
One thing traders must understand is that not every setup will continuously revisit the ORB zone after the original entry.
Sometimes price confirms and simply keeps running.
That is why the original BRACE entry matters so much.
But if price never returns back into the ORB zone, I then shift into what I call a RACE continuation entry.
At that stage, I begin looking for:
- retests of the 8 EMA
- or retests of the 20 EMA
Then I wait for confirmation again before entering continuation trades.
So instead of:
Break. Retest. And Confirm Entry
I shift into:
Retest. And Confirm Entry
That becomes:
RACE
This allows traders who missed the original BRACE setup to still participate in momentum continuation without emotionally chasing price.
Why I Prefer Executing From The 4H Chart
The 4H timeframe keeps trading cleaner and more controlled.
Lower timeframes create more noise and emotional overtrading.
The 4H allows me to focus on:
- structure
- patience
- cleaner confirmations
- better trade management
- less stress
That matters more than most traders realize.
Most traders do not need more trades.
They need better execution.
My Plan For USDCHF This Week
USDCHF has already confirmed a bullish BRACE setup above the ORB structure.
Now I want to continue seeing buyers defend the breakout zone and moving averages during pullbacks.
Here’s exactly what I need to see next:
- Price remains above the ORB zone
- Buyers continue defending pullbacks
- Bullish confirmation candles continue printing
- The 8 EMA and 20 EMA continue acting as support
- EMA pullbacks potentially create RACE continuation entries if price does not revisit the ORB
As long as USDCHF continues respecting bullish structure above the ORB, I remain bullish on this pair.