
State of Mind Trader | Market Analysis Update
As traders grow, one of the most important shifts we can make is moving away from over-analysis and into structured execution.
This week, I am refining how I apply my BRACE method (Break. Retest. And Confirm Entry.) across all pairs—and simplifying the process down to its core components.
This is not a new strategy.
This is a more disciplined, systematic way of executing what already works.
What Has Changed in My Process
Going forward, my charts will be significantly cleaner.
I am now focusing on just two key elements:
- A single 4-hour box capturing the first 4 hour candle of the trading period
- An 8 EMA to help read short-term price behavior
That’s it.
No additional overlays. No unnecessary complexity.
The goal is simple:
Let price action do the talking.
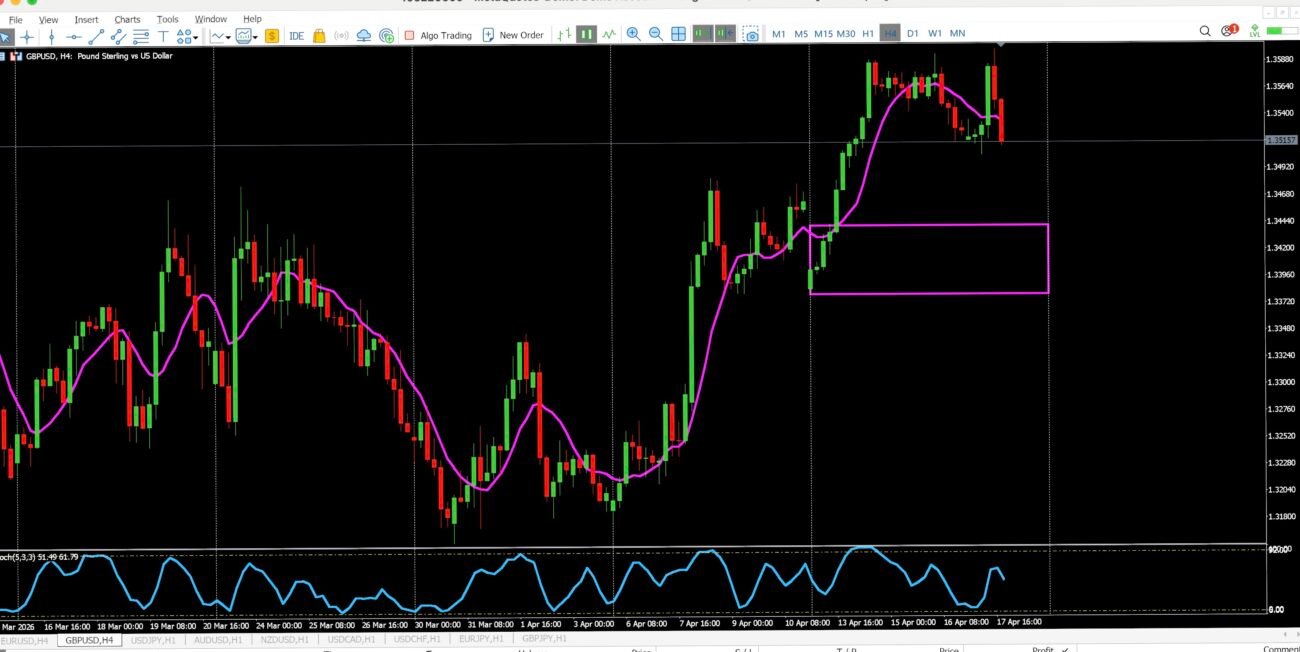
Step 1: Defining Structure on the 4-Hour Chart (GBPUSD)
In the example above, I marked out a single box using the first four 4-hour candles.
This box represents early structure and sets the foundation for the week.
Instead of reacting to every move, I allow price to show its intention relative to this range.
- If price remains inside the box → no trade
- If price breaks the box → I begin watching for opportunity
This keeps me patient and removes unnecessary entries.

Step 2: Let the Break Happen First
The break of this 4-hour box is the most important part of the process.
Not the EMA. Not the entry.
Structure comes first. Always.
Once price breaks out of the range, I am no longer guessing direction.
I am now waiting for confirmation of behavior.
Step 3: Dropping to the 1-Hour for BRACE Execution
After the breakout, I move down to the 1-hour chart to apply BRACE.
There are two ways I will approach the retest phase:
1. Traditional Retest
Price breaks the level and returns to test it before continuing.
2. Behavioral “Retry”
Instead of a clean retest, price shows a temporary move against the breakout (for example, a bearish candle after a bullish break).
This is where the 8 EMA becomes useful.
If that bearish move occurs above the 8 EMA, it often signals weak counter-momentum rather than a true reversal.
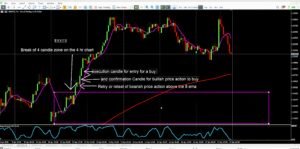
Step 4: Confirmation and Entry (GBPUSD Example)
In the GBPUSD example:
- Price broke above the 4-hour box
- A bearish candle formed after the breakout (retry)
- Price remained near and above the 8 EMA
- The next candle printed a bullish confirmation
That confirmation candle is the trigger.
👉 Entry is taken at the close of the confirmation candle, into the next candle.
No guessing. No anticipation.
Just execution based on conditions.
Why I’ve Simplified This Process
Over time, I’ve tested multiple layers of analysis—premium vs. discount, multiple moving averages, and additional confluence tools.
While those concepts are valuable, they are not always necessary for execution.
This adjustment allows me to:
- Stay focused on price structure
- Remove hesitation from decision-making
- Maintain consistency across multiple pairs
- Apply the same process in both personal trading and account management
Most importantly…
It allows me to operate from a systematic approach, not a reactive one.
What This Means for the Mastermind Group
Going forward, my market analysis will reflect this simplified structure.
You will see:
- Clean charts with clearly defined 4-hour boxes
- Less emphasis on layered indicators
- More focus on break → behavior → confirmation
This is intentional.
The goal is not to overwhelm you with information, but to help you clearly see when conditions are present—and when they are not.
Final Thoughts
Trading does not need to be complicated to be effective.
In fact, the more responsibility you take on—whether trading your own account or managing others—
the more important it becomes to rely on a system that is:
- Clear
- Repeatable
- Disciplined
BRACE remains the foundation.
This is simply a more refined way of applying it.
Stay focused. Stay patient. Let the market come to you.
—D. Michele
State of Mind Trader