
Current Market Structure on the 4-Hour Timeframe
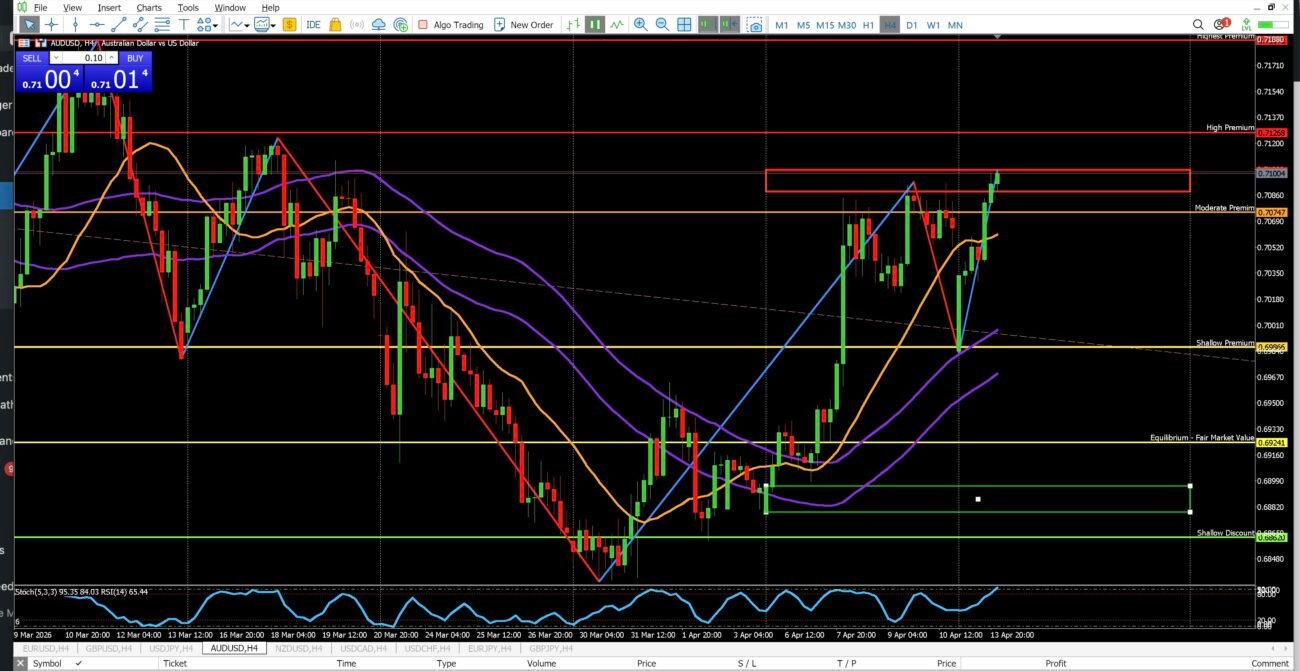
AUDUSD is currently trading within a defined structure on the 4-hour chart, with price positioning becoming increasingly important as we move into the new trading week. From a technical standpoint, price has already shown signs of expansion and is now approaching an area where decision-making becomes critical.
The overall structure suggests that price is no longer at an ideal discount level for buys. Instead, it is either approaching or already sitting within a more premium pricing zone relative to recent structure. This immediately shifts the mindset from chasing buys to becoming more patient and selective—especially when it comes to identifying high-probability sell opportunities.
Key Zones to Watch
- Sell Zone (Premium Area):
Price is approaching a region where previous reactions or resistance are likely to form. This is where I will begin watching closely for potential rejection signals. - Buy Zone (Discount Area):
The lower boundary of structure remains intact, but price would need a deeper pullback to offer a clean, high-quality buy setup. At current levels, buying would be considered less favorable unless structure significantly shifts.
Momentum and Market Behavior
Price has shown bullish movement leading into this area, but that alone is not enough to justify continued buying—especially if we are entering premium territory. Markets do not move in straight lines, and extended moves often lead to retracements or reversals.
If momentum begins to slow and we see signs of exhaustion, this could support a potential transition into a sell setup.
What I’m Looking For (Trade Scenarios)
Primary Scenario: Sell Setup (Preferred)
I am primarily preparing for a BRACE sell setup under the following conditions:
- Price reaches or slightly exceeds the current premium/sell zone
- A break of short-term structure occurs on the 4H
- Price retests that broken structure
- A clear bearish confirmation candle forms
This would provide the type of structured entry that aligns with patience, discipline, and proper positioning within the market cycle.
Secondary Scenario: Buy Setup (Lower Probability)
A buy setup would only be considered if:
- Price pulls back into a true discount zone
- Structure holds and shifts bullish again
- Confirmation is present following a retest
At this time, this scenario is less favorable and would require the market to give a deeper retracement before becoming valid.
Role of Higher Timeframe Confluence
While this analysis is based on the 4-hour chart, higher timeframe context always matters. If price is extended relative to key moving averages or higher timeframe zones, it further supports the idea of waiting rather than entering prematurely.
Patience here is not optional—it is required.
Final Thoughts
At current levels, this is not a “jump in now” type of market. This is a wait for confirmation environment.
- Buying at these levels introduces unnecessary risk
- Selling too early without confirmation is just as risky
The goal is simple: let price come into your zone, let structure confirm your idea, and then execute with precision.
There will always be another opportunity—but clean setups don’t come from forcing trades in the middle of the chart.