
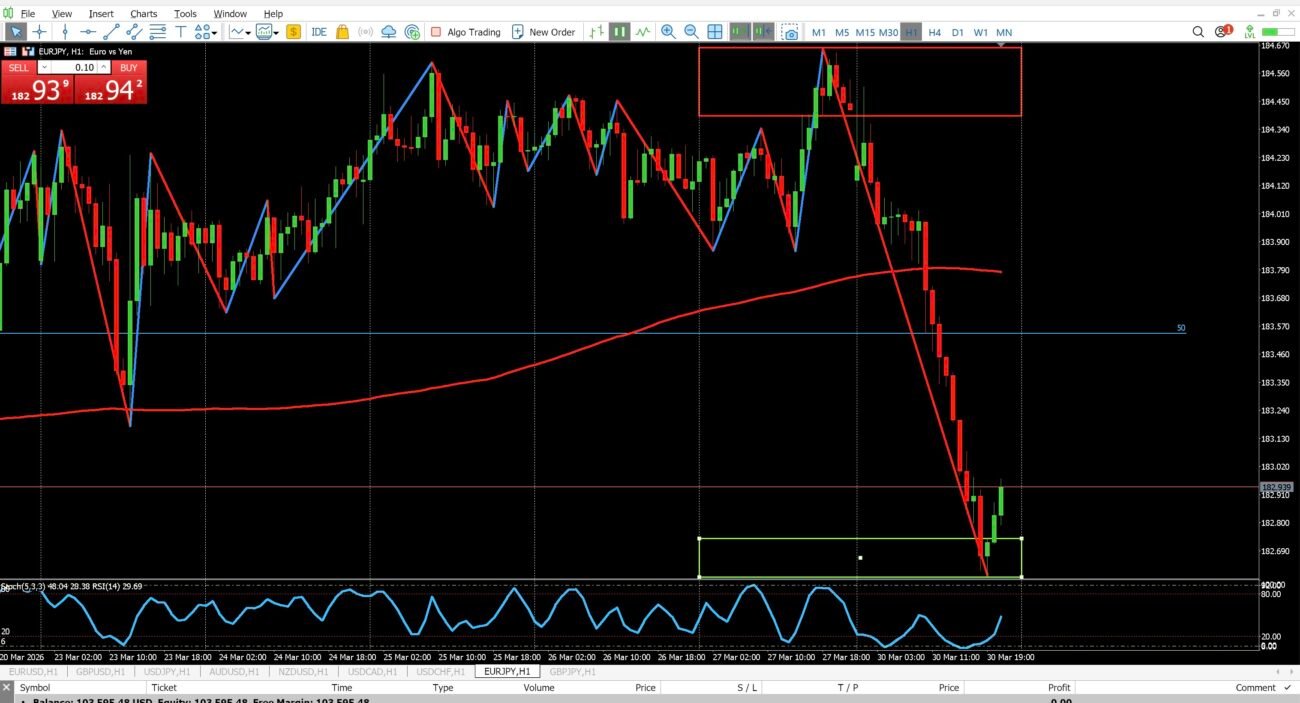
📊 Market Overview
EURJPY has pushed aggressively into discount territory based on the daily Fibonacci framework, putting price in a prime area to begin looking for potential buy setups.
Price has now tapped into a clearly defined demand zone, and we are beginning to see the first signs of a reaction.
In addition, stochastic is in oversold territory, adding another layer of confluence that price may be approaching a point of exhaustion.
However, as always — location is not the entry.
We wait for the market to complete the BRACE process.
🧠 Understanding What Just Happened
The key event here is not just the move into discount…
👉 Price has now broken out of the buy zone for the first time.
This is what qualifies as your initial confirmation.
This is not a structure break or trend shift.
This is a reaction from your zone, and it marks the beginning of the setup.
🔑 Applying the BRACE Method
B – Break (From the Zone)
- Price enters your demand zone
- Then pushes up and breaks out of the zone
✔️ This confirms buyers are stepping in
✔️ This is your first requirement — not your entry
⏳ R – Retest
Now we wait for price to return.
- Price must pull back into the zone
- The zone must hold as support
What you want to see:
- A controlled retracement
- Respect for the zone (no strong bearish close through it)
- Stability rather than volatility
🎯 C – Confirm Entry
This is where the trade is earned.
After the retest, you need:
- A bullish confirmation candle close
- Preferably a candle with:
- A strong lower wick
- A smaller body
- Clear rejection from the zone
👉 This is your entry trigger — nothing else.
📉 The Role of the 200 SMA (Context Only)
Price is currently trading below the 200 SMA, which may appear as a counter-trend setup.
But this trade is based on price location in discount, not trend continuation.
The 200 SMA remains on the chart for awareness:
- It provides context
- But it does not override a valid BRACE setup in discount
⚠️ What You Are NOT Doing
Let’s be clear:
🚫 You are NOT buying just because price is in discount
🚫 You are NOT entering just because stochastic is oversold
🚫 You are NOT taking the first reaction candle
You are waiting for the process to complete.
⚖️ Possible Outcomes
🟢 Valid Buy Setup
- Break out of the zone ✔️
- Clean retest ✔️
- Bullish confirmation candle ✔️
👉 That’s your entry
🔴 Continuation Scenario (Zone Adjustment Required)
- Price fails to hold the current demand zone
- Breaks lower with continued momentum
👉 In this case:
- No trade is taken
- The buy zone is readjusted to the new low
- You wait for a new break out of the updated zone
Then the process begins again:
Break → Retest → Confirm Entry
🎯 Final Thoughts
EURJPY has completed the first step of your process:
- ✔️ Price is in discount
- ✔️ Demand zone has been tapped
- ✔️ Break out of the zone has occurred
Now comes the part most traders skip…
⏳ The retest
⏳ The confirmation
No rushing. No anticipation.
📌 The Discipline Rule
You don’t get paid for spotting setups…
You get paid for waiting for them to complete.
Break. Retest. And Confirm Entry.
I love the breakdown that you are given us.
Thank you Carole! If you have any questions, please let me know.