
How to Use It as a BRACE Confirmation for Trade Setups
If you have been studying price action for any length of time, you have probably heard traders talk about Fair Value Gaps, also called FVGs. At first, the term can sound more complicated than it really is. But once you understand what it means, it becomes a very useful tool for reading market movement with more precision.
A Fair Value Gap is simply an imbalance in price. It happens when the market moves so strongly in one direction that it leaves behind an area where price did not trade efficiently. In many cases, the market will later return to that area before continuing in its original direction.
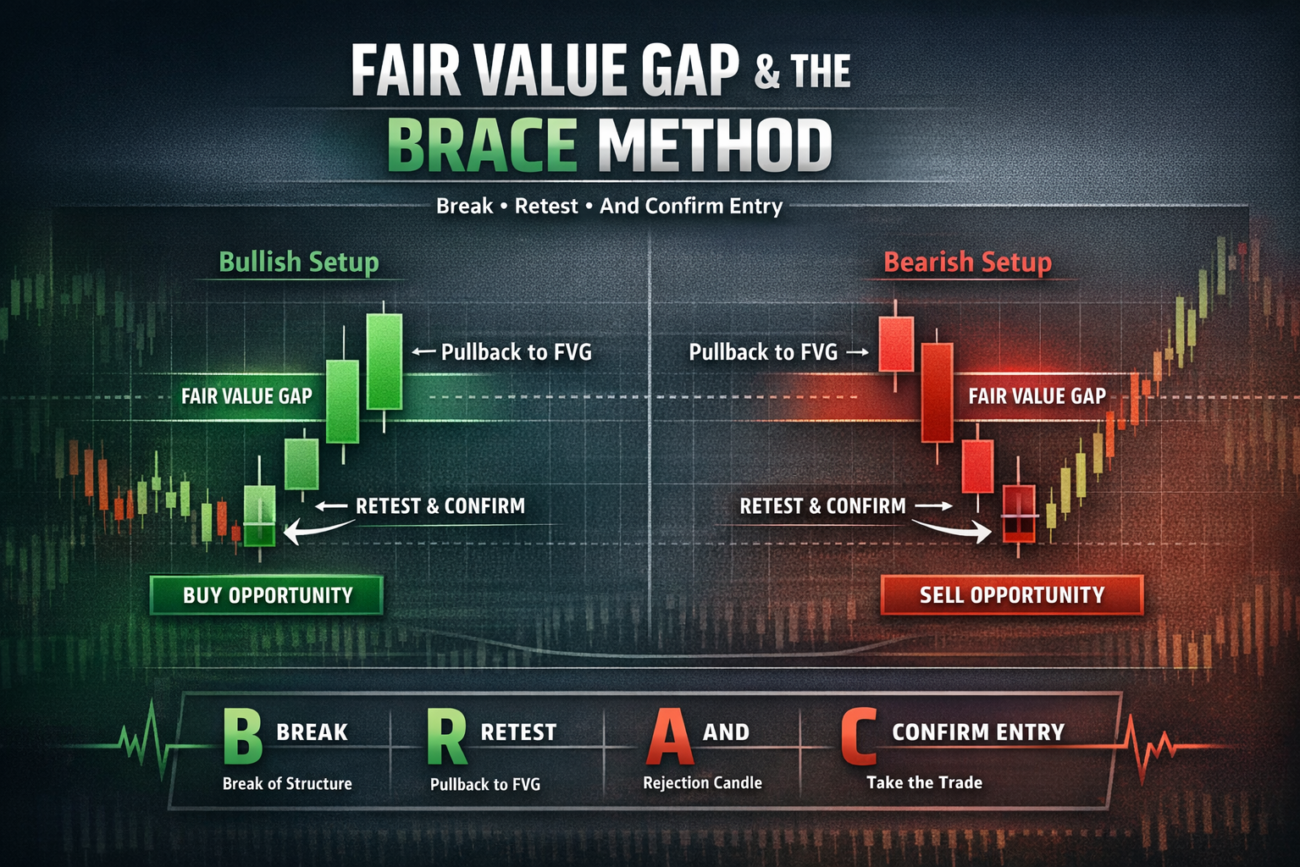
For traders who use the BRACE method — Break, Retest, And Confirm Entry — Fair Value Gaps can be especially helpful. They can serve as an additional confirmation that the market is returning to an important area before the next move begins.
What Is a Fair Value Gap?
A Fair Value Gap forms when price moves aggressively and creates a visible imbalance between candles.
The most common way to identify it is with a three-candle pattern:
- The first candle starts the move
- The second candle is the strong impulse candle
- The third candle continues the move without fully retracing the prior candle’s range
The result is a gap or imbalance between the first and third candle. That gap becomes the Fair Value Gap.
In simple terms, price moved too fast through that area. Because of that, the market will often come back to revisit it.
Why Fair Value Gaps Matter
Markets do not always move in a smooth and balanced way. Sometimes price explodes upward or downward with strong momentum. When that happens, it can leave behind an area where buying and selling were out of balance.
That imbalance matters because the market often returns to those levels later. Traders watch these zones because they can act like magnets for price.
This does not mean every Fair Value Gap will hold perfectly. It simply means these areas are worth paying attention to, especially when they line up with your overall trade idea.
Bullish and Bearish Fair Value Gaps
Bullish Fair Value Gap
A bullish Fair Value Gap forms when price pushes upward aggressively. The imbalance is left below current price. If the market comes back down into that gap and holds, it may offer a buying opportunity.
Bearish Fair Value Gap
A bearish Fair Value Gap forms when price drops aggressively. The imbalance is left above current price. If the market pulls back up into that gap and rejects it, it may offer a selling opportunity.
The key is not just seeing the gap. The key is understanding where it forms and whether it supports your market bias.
How Fair Value Gaps Fit Into BRACE
The BRACE method stands for:
Break. Retest. And Confirm Entry.
This is where Fair Value Gaps become very useful.
Instead of treating the retest like a vague idea, a Fair Value Gap can help define a more precise area where the retest may happen.
Let’s break that down.
B = Break
The first step is the break.
This is where price clearly moves beyond an important level, zone, or structure point. That could be:
- A break of a recent high or low
- A break from a trading range
- A break beyond Friday’s high or low
- A break from a premium or discount reaction zone
The break tells you that price has shown intention.
R = Retest
After the break, you do not want to chase price. This is where many traders get trapped. They enter late, then get caught in the pullback.
Instead, you wait for price to come back.
A Fair Value Gap can help identify where that retest may occur.
For example:
- If price breaks upward strongly and leaves behind a bullish Fair Value Gap, that gap may become the retest zone for a buy
- If price breaks downward strongly and leaves behind a bearish Fair Value Gap, that gap may become the retest zone for a sell
This is one of the cleanest ways to combine structure and timing.
A + C = And Confirm Entry
This is the part that keeps you out of low-quality trades.
Just because price enters a Fair Value Gap does not mean you immediately enter the trade. You still want confirmation.
This is where your BRACE method stays disciplined.
Inside or near that Fair Value Gap, you can look for confirmation such as:
- A pin bar
- A rejection candle with a strong wick
- A small-bodied candle showing hesitation
- An engulfing candle
- A clear stall in momentum
The Fair Value Gap helps define the area. The confirmation candle helps validate the entry.
That is the difference between a setup and a guess.
Example of a Buy Setup Using BRACE and a Fair Value Gap
Here is how this may look in a bullish setup:
- Price moves into a discount area
- Price breaks upward from structure
- That move creates a bullish Fair Value Gap
- Price pulls back into the gap
- A bullish rejection candle forms
- Entry is considered only after confirmation appears
This creates a more structured trade idea because you are no longer buying randomly. You are waiting for a break, a retest into imbalance, and confirmation at the right location.
Example of a Sell Setup Using BRACE and a Fair Value Gap
Here is the bearish version:
- Price moves into a premium area
- Price breaks downward from structure
- The move creates a bearish Fair Value Gap
- Price pulls back up into the gap
- A bearish rejection candle forms
- Entry is considered only after confirmation appears
This gives you a clean framework for letting price come back into value before looking for the next push lower.
Tips for Applying Fair Value Gaps to BRACE
1. Start with price location first
For your method, this is critical.
Before you even think about the Fair Value Gap, ask:
- Is price in discount for a buy idea?
- Is price in premium for a sell idea?
The Fair Value Gap should support the setup, not replace your overall framework.
2. Use the Fair Value Gap as an area, not a magic line
A Fair Value Gap is a zone of imbalance. Treat it as an area where price may react, not as an exact pip-perfect entry every time.
3. Wait for confirmation inside or near the gap
This is where BRACE keeps the trade clean. Let the market prove itself before entering.
4. Look for strong gaps created by real momentum
Not every small gap on the chart matters. Focus on clear imbalances that were created by strong directional movement.
5. Do not chase price if the gap is missed
If price never comes back to the Fair Value Gap, let it go. A missed trade is better than a forced trade. The market will give another setup.
6. Keep the 200 SMA in perspective
If the 200 SMA is on your chart, use it for awareness. It may help explain the bigger picture, but your actual trade idea should still be based on price location, structure, and confirmation.
Why This Matters for Trade Quality
One of the biggest mistakes traders make is entering too early or too emotionally. They see price move and feel like they need to jump in before they miss it.
Fair Value Gaps can help slow that process down.
They encourage patience.
Instead of chasing the breakout, you wait for price to return to an imbalance. Then you wait for confirmation. That extra patience can improve timing, reduce emotional entries, and help you stay aligned with the structure of the market.
In other words, the Fair Value Gap does not replace BRACE. It strengthens it.
Final Thoughts
A Fair Value Gap is simply an area where price moved too aggressively and left behind an imbalance. When the market comes back into that area, it can provide a useful clue about where the retest may happen.
For traders using the BRACE method, this can be a valuable addition to the process:
- Break gives direction
- Retest brings price back into a meaningful area
- And Confirm Entry keeps the setup disciplined
When a Fair Value Gap appears in the right location and price gives proper confirmation, it can help create cleaner, more intentional trade setups.
The goal is not to trade every Fair Value Gap you see.
The goal is to recognize when a Fair Value Gap supports your existing BRACE framework and gives you one more reason to trust the setup
If you are learning how to trade with more patience and precision, Fair Value Gaps can be a useful tool to study alongside the BRACE method. The key is to let them support your analysis, not replace it.
To learn more about how I break down trade setups using structure, price location, and confirmation, be sure to explore more market analysis here on State of Mind Trader.