
Going forward, my focus is simple:
I trade based on price location first — specifically whether price is in premium or discount.
Right now, GBPUSD has pushed into a discount zone, which immediately shifts my focus from selling to preparing for potential buying opportunities.
Current Market Context
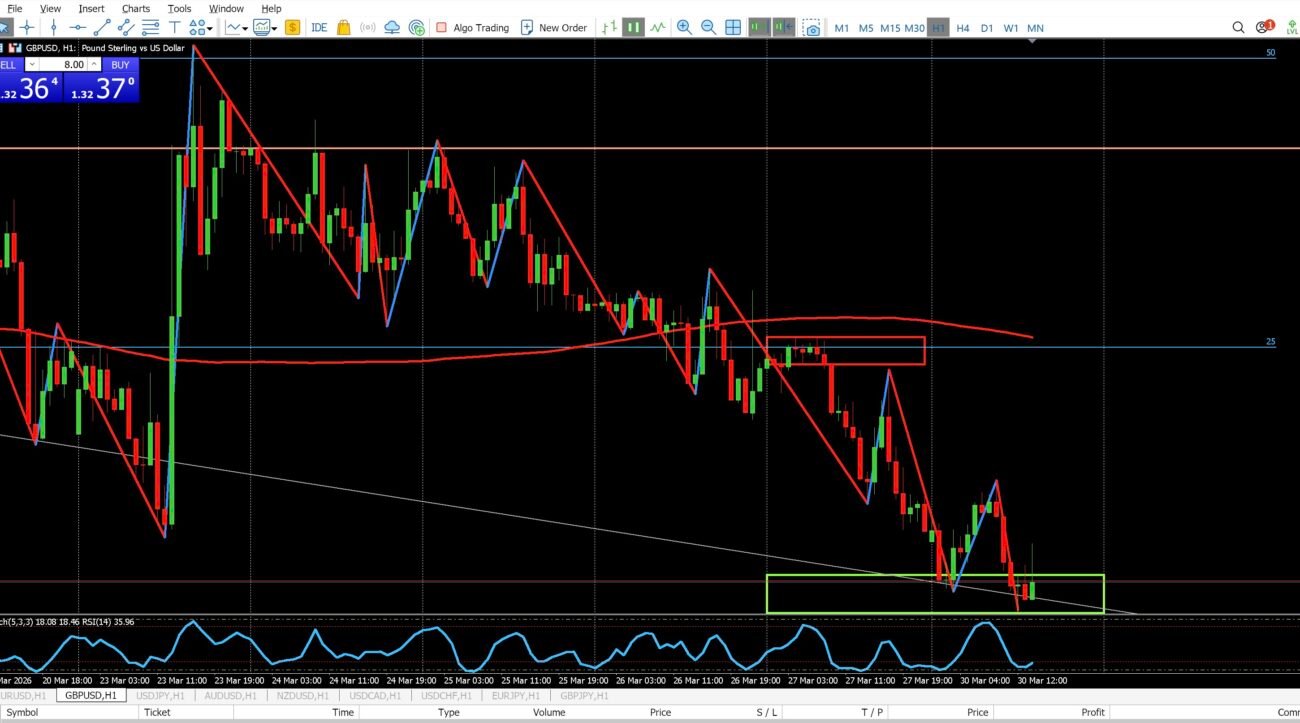
On the 1-hour chart, GBPUSD has been trending bearish, printing consistent lower highs and lower lows.
Price has also been trading below the 200 SMA, which tells us the overall directional pressure is still to the downside.
However, and this is important ,
I do not use the 200 SMA as my reason to enter trades.
I use it for:
- Awareness of overall direction
- Context of market pressure
But my entries are based on price location (premium vs. discount).
So even though price is below the 200 SMA, I am not looking to sell here — because price is no longer at a favorable selling location.
Zone Adjustment After Friday’s Low Break
Price broke below the previous Friday’s low, which is a key structural level.
Because of that:
- I adjusted my zone lower
- Repositioned it into the new discount area
- And now I’m watching how price behaves at this updated level
This keeps my analysis aligned with current price behavior, not outdated structure.
The BRACE Method in Action
This setup is a clean example of the BRACE methodology:
B — Break
Price broke below support, including the previous Friday’s low.
R — Retest
Price pulled back and began interacting with the adjusted zone.
A — And
Continuation of the process — no added interpretation.
C — Confirm
We are currently here.
Price is reacting at a discount level, and a bullish candle is forming.
E — Entry
If price closes with a strong bullish candle above the zone, this becomes a valid buy opportunity.
What I’m Looking For Next
I’m not entering based on assumption. I’m waiting for confirmation.
For this setup to trigger:
- A strong bullish candle close
- Preferably with rejection from the lows (wicks)
- A close back above the zone
This tells me buyers are stepping in with intention.
Trade Plan (Simple and Controlled)
If confirmation is met:
- Entry: On bullish close (or slight pullback)
- Stop Loss: Below the zone / recent low
- Take Profit: 1:1 risk-to-reward
This is a reaction trade from discount, not a full trend reversal.
Understanding the 200 SMA in This Setup
At first glance, this trade may look like I’m going against the 200 SMA.
But that’s not the case.
- The 200 SMA tells me the market is currently bearish
- The discount zone tells me price is temporarily undervalued
👉 That creates an opportunity for a short-term reaction move, even within a bearish market
So:
- I respect the 200 SMA for context
- But I execute based on price location and confirmation
Key Insight
Even in a bearish market, price must return to value.
That means:
- I don’t sell in discount
- I don’t buy in premium
- I let price come to me, then I wait for confirmation
Final Thoughts
This is what disciplined trading looks like.
Price has:
- Broken structure
- Taken out Friday’s low
- Forced a new discount zone to form
- And is now attempting to confirm. If price give a weak bullish candle with selling pressure, do not enter.
If confirmation completes, I take the trade.
If not, I wait.
No forcing. No guessing. Just execution.